Mold removal is a multi-faceted process that requires careful planning, execution, and follow-through. Addressing mold growth effectively helps to protect not only the structural integrity of a building but also the health of its occupants. Below, we’ll explore the comprehensive steps involved in removing mold and ensuring it doesn’t return.
Why Mold Removal is Essential
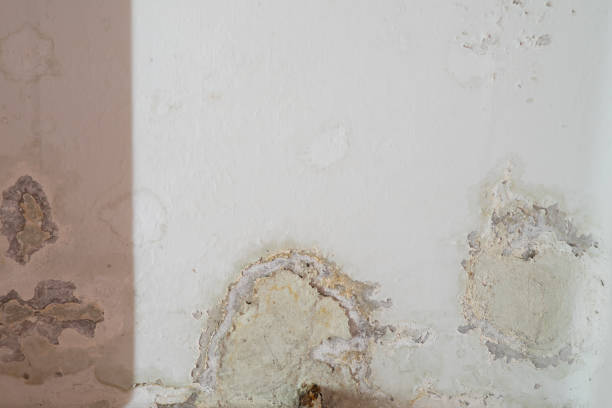
Mold thrives in damp environments and can lead to various health issues, including respiratory problems, allergic reactions, and skin irritation. Beyond health risks, mold can damage walls, ceilings, furniture, and even foundational structures if left untreated. Understanding how to properly eliminate mold is key to mitigating these risks.
The Key Components of Mold Removal
- Identify areas affected by mold growth using visual inspections or tools like moisture meters.
- Determine the type of mold present with professional testing if necessary.
- Isolate areas with heavy contamination using barriers like plastic sheeting or negative air machines to prevent spores from spreading during removal.
- Use HEPA filters (High-Efficiency Particulate Air) during remediation to capture airborne spores and maintain clean indoor air quality.
- Safely remove porous materials (e.g., drywall or carpeting) that cannot be salvaged due to contamination severity.
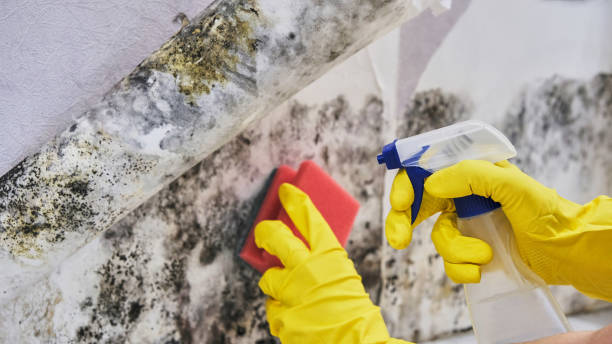
- Clean non-porous surfaces thoroughly with specialized cleaning agents designed for mold remediation.
- Repair leaks or address high humidity levels that contributed to mold formation initially.
- Apply anti-microbial treatments in vulnerable areas as a preventive measure against recurrence.
Common Tools Used During Mold Removal
| Equipment | Purpose |
| HEPA Vacuum | Captures fine particles such as spores from surfaces |
| Protective Gear (PPE) | Ensures safety by reducing exposure to spores |
| Air Scrubbers | Removes airborne contaminants during remediation |
| Dehumidifiers | Reduces excess moisture levels |
Tips for Effective Mold Removal
- Always address the underlying causes of moisture before starting remediation.
- Avoid DIY solutions unless you are trained in proper techniques; improper handling can worsen contamination.
- Seek professional help when dealing with extensive infestations or toxic black molds like Stachybotrys chartarum.
- Regularly inspect high-risk areas such as basements, crawl spaces, bathrooms, and kitchens.
By following an organized approach to mold removal and adopting preventative measures post-removal, you can create healthier indoor environments free from harmful contaminants.
Effective Mold Removal Services Florida: Why Containment Matters During Remediation
Mold containment is a critical step in the remediation process to prevent the spread of mold spores to unaffected areas of a home or building. Without proper containment methods, mold can easily travel through air or attach itself to surfaces, leading to further contamination and health risks. This section explains why containment is vital during mold removal and outlines effective strategies for implementing it.
Why Mold Containment is Crucial
- Prevents Cross-Contamination: Mold spores are microscopic and can become airborne during the remediation process, contaminating clean areas.
- Protects Occupants’ Health: Exposure to airborne mold spores can cause respiratory issues, allergies, or exacerbate existing health conditions.
- Improves Efficiency: Proper containment isolates the affected area, allowing professionals to focus their efforts on targeted remediation without worrying about secondary contamination.
Key Techniques for Effective Mold Containment
- Conduct a thorough assessment of visible and hidden mold growth.
- Use moisture meters or infrared cameras to detect areas at risk of infestation.
- Utilize polyethylene sheeting (6-mil thickness or higher) to create barriers around contaminated spaces.
- Seal off doorways and vents with zipper doors or taped sheeting.
- Install HEPA-filtered air scrubbers that create negative air pressure within the contained space.
- This prevents contaminated air from escaping into surrounding areas.
- Restrict entry into the containment zone only to trained personnel equipped with appropriate personal protective equipment (PPE).
- Ensure tools used in the zone remain within the area until they are properly decontaminated.
- Place adhesive tack mats at exits of the containment area to capture dust and spores that may cling to workers’ shoes or equipment.
Types of Containment Systems
| Containment Type | Description |
| Limited Containment | Suitable for small-scale infestations (under 10 square feet). |
| Full Containment | Necessary for larger infestations where extensive demolition may be needed. |
Best Practices for Maintaining Containment Integrity
- Monitor sealed barriers regularly for tears or damage.
- Verify that negative air pressure is consistently maintained using manometers.
- Minimize movement in and out of the contained area as much as possible.
By adhering to these practices, you can significantly reduce the risk of spreading dangerous mold spores while safeguarding both property and health during remediation efforts.
Choosing the Right Mold Removal Company Florida for Effective Containment During Remediation
Mold containment is a critical component of the remediation process. It helps to prevent the spread of mold spores to unaffected areas, protecting both the building structure and its occupants. Without proper containment, airborne mold particles can rapidly migrate, leading to further contamination and potential health hazards. Here’s a detailed overview of why mold containment is essential and how it is effectively implemented during remediation.
Why Mold Containment Matters
- Preventing Cross-Contamination
Mold spores are microscopic and can easily become airborne when disturbed. Without containment, these spores may infiltrate adjacent rooms or HVAC systems, spreading the infestation further. - Protecting Health
Exposure to mold spores can trigger allergies, respiratory issues, and other health problems for building occupants and workers involved in remediation. - Minimizing Costs
Containing the affected area limits the extent of cleanup required, reducing both time and expenses associated with additional remediation efforts.
Key Steps in Mold Containment
- Establishing Negative Air Pressure
Negative air pressure ensures that air flows into the contaminated area but does not escape outside of it. This method prevents mold spores from migrating to clean spaces. - Sealing Off Affected Areas
Plastic sheeting (6-mil or thicker) is often used to create barriers around contaminated zones such as walls, ceilings, or floors. - Using Airlocks and Zipper Doors
Temporary airlocks or zipper doors allow controlled access for workers while keeping mold spores contained within a specific area. - Deactivating HVAC Systems
The heating, ventilation, and air conditioning (HVAC) system should be turned off in the contaminated zone to stop spores from circulating through ducts into other parts of the building.
Tools Commonly Used in Mold Containment
| Tool/Equipment | Purpose | Example Usage |
| Plastic Sheeting | Creates physical barriers | Cover walls or enclose work zones |
| HEPA Filters | Traps airborne mold spores | Installed in negative air machines |
| Negative Air Machines | Maintains airflow direction | Prevents spore migration |
| Tape & Fasteners | Secures plastic sheeting | Ensures tight seals around barriers |
Best Practices for Maintaining Containment
- Regularly inspect barriers for tears or gaps that could compromise containment.
- Ensure workers wear proper personal protective equipment (PPE), such as masks, gloves, goggles, and suits.
- Clean tools thoroughly after use to avoid transferring contamination.
- Dispose of waste materials correctly — bagging them in sealed containers before removal from the site.
- Maintain negative pressure at all times until remediation is complete.
By implementing robust containment measures during mold remediation projects, professionals can mitigate risks effectively while ensuring safe living or working conditions for all occupants involved in the process.
Effective Water Damage Restoration Florida: Air Filtration for Mold Removal
Effective air filtration is a critical component of mold remediation, as it ensures the containment and removal of airborne mold spores during the cleanup process. Mold spores are microscopic and can easily become airborne during remediation, increasing the risk of further contamination and potential health issues. Implementing proper air filtration techniques helps to maintain a safe environment for both workers and occupants.
Why Is Air Filtration Crucial?
- Capturing microscopic mold spores.
- Reducing cross-contamination between affected and unaffected areas.
- Improving indoor air quality during and after remediation.
Types of Air Filtration Systems
- Capable of trapping particles as small as 0.3 microns at an efficiency rate of 99.97%.
- These filters are essential for capturing airborne mold spores effectively.
- Often paired with HEPA filters to eliminate odors associated with mold growth.
- Useful in situations where musty smells linger after cleaning.
- Portable units that use HEPA filters to remove contaminants from the surrounding air.
- Ideal for localized areas undergoing remediation.
- Create negative pressure in enclosed spaces to prevent contaminated air from spreading to clean areas.
- Often used with containment barriers for maximum effectiveness.
| Filter/System Type | Primary Function | Typical Use Case |
| HEPA Filter | Traps fine particles like mold spores | Standard tool for all remediation projects |
| Activated Carbon Filter | Removes odors | Supplementary to HEPA filters |
| Air Scrubber | Cleans polluted air | Portable solution for specific zones |
| Negative Air Machine | Prevents cross-contamination | Enclosed spaces with containment setups |
Steps to Implement Effective Air Filtration
- Set Up Containment Zones:
Use plastic sheeting or other barriers to create isolated zones where remediation will occur. - Install Negative Pressure Systems:
Place negative air machines at the containment entry/exit points to prevent airflow into unaffected areas. - Position HEPA Filters Strategically:
Install HEPA-filtered devices near work areas where disturbance of materials may release spores into the air. - Regularly Inspect Equipment:
Replace filters as needed according to manufacturer guidelines to maintain efficiency throughout the process. - Monitor Air Quality Post-Remediation:
Use professional testing equipment or hire certified technicians to confirm that spore levels have returned to acceptable thresholds before removing containment barriers.
Additional Tips for Optimal Results
- Ensure all workers wear proper personal protective equipment (PPE), including respirators equipped with P100 filters.
- Keep doors and windows closed during active remediation unless necessary ventilation is required.
- Always clean HVAC vents if they were exposed during a contamination event, as spores can settle within ducts and redistribute later on.
By incorporating these proven techniques into your mold removal strategy, you can significantly reduce risks while ensuring healthier indoor environments post-remediation efforts.
How to Conduct a Safe Mold Inspection Florida Homeowners Can Trust
Proper removal and disposal of mold-infested materials are critical steps in the remediation process. Neglecting to handle contaminated items carefully can result in further mold spread, health risks, and contamination of unaffected areas. Below is a comprehensive guide to ensure safe and effective disposal practices.
Assessing the Level of Contamination
- The type of material: Porous materials like drywall, ceiling tiles, carpets, and upholstered furniture are often difficult to clean thoroughly and may need to be discarded.
- Extent of mold growth: Heavily infested items with visible damage may pose continued risks and should be removed.
- Material value or significance: Non-replaceable or high-value items may warrant professional restoration services rather than disposal.
Safe Removal Guidelines
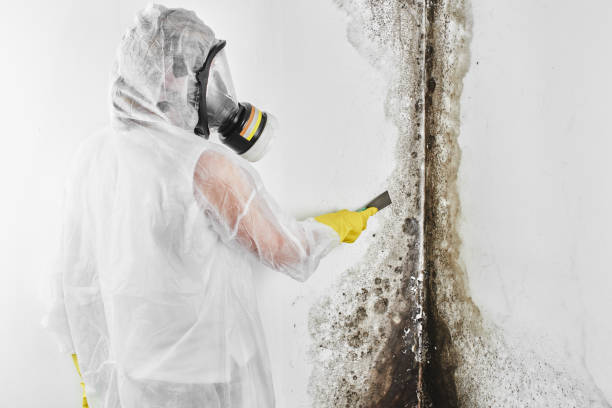
- Use gloves (preferably nitrile or rubber), protective eyewear, N95 respirators or higher-grade masks, disposable coveralls, and shoe covers.
- Isolate work zones using plastic sheeting and tape to prevent mold spores from traveling to unaffected spaces.
- Avoid excessive cutting or breaking apart materials during removal as this releases spores into the air.
- Place discarded materials in heavy-duty garbage bags (6 mil thickness recommended) and seal tightly before placing them into a second bag for additional containment.
- Vacuum surfaces using a HEPA-filtered vacuum cleaner followed by wiping down areas with an EPA-approved antimicrobial cleaner.
Proper Disposal Practices
| Disposal Step | Best Practice Recommendations |
| Labeling | Mark bags clearly as “mold-contaminated waste.” |
| Immediate Transport | Remove the waste from the property as soon as possible; do not leave it stored indoors or near vents. |
| Local Guidelines | Check municipal rules on disposal; some areas may require specific handling at designated facilities. |
Items That May Be Salvageable
- Steam cleaning for hard surfaces (e.g., metals, glass)
- Professional laundering for textiles treated with antifungal detergents
- Restoration services for valuable papers or books
Preventative Measures After Removal
After disposing of contaminated materials safely: – Inspect remaining structural elements like walls or subfloors for signs of hidden mold. – Address any underlying moisture issues that contributed to the outbreak.
By following these practices diligently, you can significantly reduce health risks while ensuring a safer indoor environment moving forward.
Thorough Cleaning of Belongings Affected by Mold Contamination
When dealing with mold contamination, it’s essential to properly clean and restore belongings to ensure they are safe for use and free from harmful mold spores. This step is a critical part of the broader remediation process, as improperly cleaned items can reintroduce mold into a space, leading to recurring issues. Below is a detailed guide on how to thoroughly clean and restore belongings affected by mold.
Key Considerations Before Cleaning Mold-Affected Items
- Porous materials (e.g., upholstered furniture, paper, or textiles) are more challenging to clean because mold can penetrate deeply into their structure. If an item is heavily contaminated, disposal may be the safer choice.
- Non-porous or semi-porous materials (e.g., glass, metal, or hard plastics) are generally easier to clean.
- Always wear gloves, goggles, and an N95 respirator mask while handling mold-contaminated items.
- Ensure you are working in a well-ventilated area or utilize negative air pressure systems if indoors.
- Isolate items affected by mold from unaffected belongings to prevent cross-contamination.
- Place smaller contaminated objects in sealed plastic bags until they can be cleaned or disposed of.
Cleaning Methods for Affected Belongings
| Material Type | Recommended Cleaning Method |
| Hard Surfaces (e.g., glass, metal) | Wipe down with soap and water followed by a disinfectant like hydrogen peroxide or diluted bleach. |
| Textiles and Fabrics | Wash in hot water with laundry detergent and vinegar. For severe cases, consult professional dry cleaners who specialize in mold removal. |
| Wood Furniture | Clean with mild soap and water; avoid over-saturating the surface as moisture retention can lead to further mold growth. Sanding may be required for heavily infested areas followed by sealing the wood afterward. |
| Paper Documents | Use HEPA vacuuming on dry documents followed by freezing techniques (lyophilization) if professional restoration is required. |
| Electronics | Avoid direct application of cleaning solutions; consult electronics repair experts for safe cleaning procedures. |
Steps for Effective Mold Removal from Belongings
- Vacuuming with HEPA Filters
Use a vacuum equipped with HEPA filters to remove loose spores from surfaces before applying any cleaning solutions. - Use Appropriate Cleaning Agents
Disinfectants such as vinegar or antimicrobial sprays are effective against most strains of household molds without introducing harsh chemicals into your environment. - Dry Thoroughly After Cleaning
Moisture left behind after cleaning provides the perfect environment for new mold colonies to form:- Use dehumidifiers or place cleaned items under direct sunlight for faster drying.
- Ensure airflow around drying items by using fans where appropriate.
- Inspect Items Post-Cleaning
Look closely at each item once cleaned and dried:- Discoloration may indicate residual damage that cannot be remediated fully.
- If musty odors persist after cleaning, consider additional treatments like ozone generators (used only under professional guidance).
When to Seek Professional Help
For valuable heirlooms, sensitive electronics, or extensive infestations on critical belongings (e.g., mattresses), enlisting professionals who specialize in content cleaning may provide better results than DIY efforts alone.
Thoroughly addressing every affected item during the remediation process not only safeguards personal possessions but also helps ensure that your space remains free from future contamination risks caused by overlooked sources of mold spores. Always prioritize safety during this process and seek expert guidance when needed for complex situations involving cherished valuables or irreplaceable belongings.
Effective Structural Drying Solutions for Mold Removal Florida Residents Can Rely On
Structural drying is a critical component in mold remediation and prevention. Left unchecked, excessive moisture can weaken building materials, create an environment conducive to mold growth, and lead to long-term structural damage. Implementing effective structural drying techniques not only halts the spread of mold but also safeguards the integrity of a building’s structure. Let’s explore how this process works and why it’s so vital.
Why Moisture Control is Essential
- Leaks from pipes, roofs, or appliances
- Flooding incidents
- Poor ventilation or high humidity levels
- Condensation due to temperature imbalances
If moisture isn’t addressed swiftly and thoroughly, it creates a breeding ground for mold spores. Furthermore, prolonged exposure to water can deteriorate drywall, wood framing, insulation, and flooring materials.
Steps Involved in Structural Drying
- Identifying areas with high moisture content by using tools such as moisture meters or infrared cameras.
- Determining whether hidden spaces like wall cavities or subflooring have been impacted.
- Removing standing water using pumps or vacuums.
- Ensuring no residual pooling remains on floors or low-lying surfaces.
- Deploying high-powered air movers to promote airflow across wet surfaces.
- Accelerating evaporation rates by circulating warm air effectively.
- Using industrial-grade dehumidifiers to extract moisture from the air.
- Reducing indoor relative humidity levels to below 50%, which discourages mold growth.
- Continuously checking for remaining damp spots using specialized equipment.
- Adjusting drying strategies as needed based on environmental conditions.
Tools and Equipment for Structural Drying
| Tool/Equipment | Purpose |
| Moisture Meters | Measure moisture levels in walls, flooring, or other materials |
| Infrared Cameras | Detect hidden pockets of water behind surfaces |
| Air Movers | Increase airflow over affected areas for faster drying |
| Dehumidifiers | Remove excess humidity from indoor air |
| Hygrometers | Monitor relative humidity throughout the space |
Benefits of Structural Drying During Mold Remediation
- Prevents Future Mold Growth: By eliminating residual moisture completely, it reduces the likelihood of recurring contamination.
- Protects Building Integrity: Drywall, wood framing, and other materials are preserved instead of being replaced unnecessarily.
- Minimizes Health Risks: Proper drying limits airborne spores that could otherwise pose respiratory hazards.
- Cost Savings Over Time: Preventative measures like structural drying are far less expensive than repairing extensive damage caused by neglected water issues.
Addressing Hidden Moisture Concerns
One common oversight during remediation is failing to address hidden sources of moisture. Spaces such as behind walls, under flooring systems, or inside HVAC ducts often harbor trapped water that isn’t immediately visible but still contributes significantly to long-term problems if ignored during remediation efforts. Using advanced tools like thermal imaging helps identify these concealed risks early in the process.
By incorporating thorough structural drying practices into your overall mold removal strategy, you ensure not only immediate relief but also lasting protection against future outbreaks—preserving both safety and property value over time.
How Structural Drying Prevents Damage from Moisture and Aids in Mold Removal
Structural drying is a critical step in mold remediation, designed to address excess moisture that contributes to mold growth. By effectively removing water and restoring proper humidity levels, structural drying minimizes further damage while creating an environment unfavorable for mold proliferation. Below, we explore the importance of structural drying, its methods, and how it supports both mold removal and long-term prevention.
The Role of Moisture in Mold Growth
- Water leaks from plumbing or roofing
- Flooding incidents
- Condensation on windows or walls
- High indoor humidity levels
When these issues are not addressed promptly, they can lead to the development of hidden mold colonies within walls, ceilings, or beneath flooring. Structural drying is key to mitigating these risks.
Benefits of Structural Drying
- Prevents secondary damage: Water not only damages materials such as drywall and wood but also weakens the integrity of structures over time.
- Stops mold growth at its source: Removing excess moisture eliminates one of the primary conditions necessary for mold reproduction.
- Reduces remediation costs: Addressing moisture early prevents larger-scale repairs that could result from prolonged exposure.
By incorporating structural drying into the mold removal process, professionals ensure optimal results while protecting the property’s value.
Methods Used in Structural Drying
- Using industrial-grade pumps or vacuums to remove standing water quickly from affected areas.
- High-powered air movers are strategically placed around a space to increase airflow across surfaces like walls and floors.
- This enhances evaporation rates for lingering moisture within materials.
- Dehumidifiers reduce indoor humidity by collecting vaporized water from the air.
- Refrigerant dehumidifiers are effective for cooler environments, while desiccant dehumidifiers work well in more extensive restoration projects.
- Technicians use meters and sensors to track moisture levels in building materials continuously.
- Data from monitoring ensures complete dryness before proceeding with rebuilding or restoration efforts.
| Equipment/Technique | Purpose | Example Use Cases |
| Industrial Vacuums | Rapid removal of standing water | Flooded basements |
| Air Movers | Enhancing evaporation | Wet carpets or drywall |
| Dehumidifiers | Lowering indoor humidity | Post-leak restoration |
| Moisture Meters/Sensors | Measuring dryness levels | Ensuring material readiness |
Long-Term Impact on Mold Prevention
- Encourages faster identification of potential vulnerabilities (e.g., leaky pipes).
- Supports healthy indoor air quality by reducing dampness-related pollutants.
- Prevents warping or rotting that would otherwise create spaces conducive to new mold growth.
Proper structural drying not only facilitates effective mold removal but also safeguards against recurring problems stemming from persistent moisture issues. Integrating this essential step into any remediation plan is vital for maintaining a safe, habitable environment over time.
- Effective Mold Remediation Florida Tips to Prevent Mold Growth in Your Home
- Comprehensive Guide to Mold Remediation Florida: Identifying and Solving Indoor Moisture Problems
- Mold Remediation Florida: Comprehensive Services and Resources for Safe and Effective Mold Removal
- Effective Mold Removal Florida: A Step-by-Step Guide to Remediation
- Comprehensive Guide to Mold Remediation Florida Homes Need
- What to Expect from Mold Removal Services Florida and How Professionals Handle the Process
- 6 Steps to Comprehensive Mold Remediation in Florida
- Comprehensive Guide for Mold Removal Florida Residents Can Trust
- Effective Mold Removal Florida: Key Steps and Professional Techniques