Mold remediation is an essential process for protecting your home or workplace from potential health hazards and structural damage caused by mold growth. If you’re planning to hire professionals for this task, understanding what to expect during the process can help you feel more confident and prepared.
Initial Assessment and Inspection
– Identify areas affected by mold growth.
– Use specialized tools such as moisture meters, infrared cameras, or air sampling equipment to locate hidden mold colonies.
Once the inspection is complete, they provide a detailed report outlining:
– The type(s) of mold present (if testing was conducted).
– Areas requiring immediate attention.
– Recommended steps for remediation.
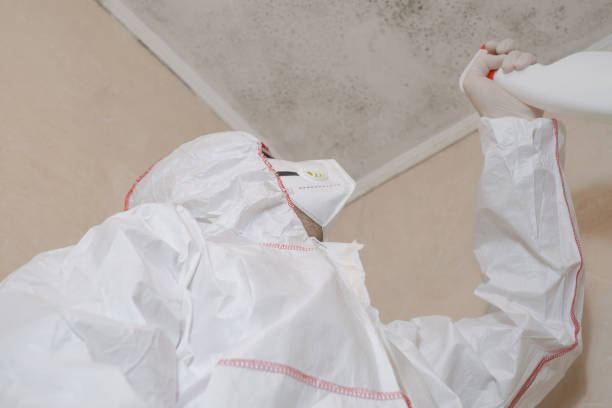
Containment of Affected Areas
To prevent mold spores from spreading to unaffected areas, professionals set up containment measures such as:
– Sealing off contaminated rooms with plastic sheeting and duct tape.
– Using negative air machines equipped with HEPA filters to create a pressure barrier.
This step ensures that airborne spores don’t escape into clean spaces during removal efforts.
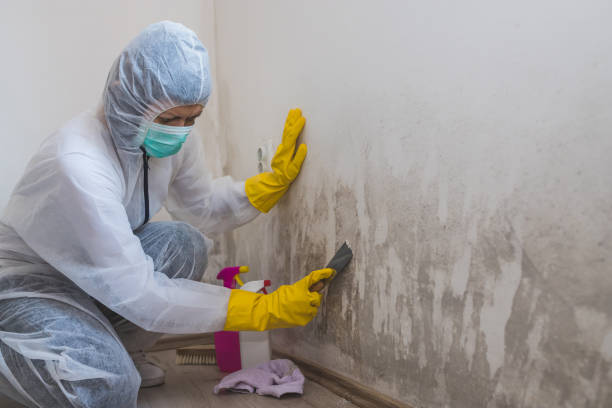
Mold Removal Process
- Surface Cleaning: For nonporous surfaces like glass or metal, they use antimicrobial cleaners and scrubbing tools to remove visible signs of mold growth.
- Porous Material Removal: If drywall, carpets, or insulation are heavily contaminated, they are safely removed and disposed of according to local regulations.
- Vacuuming with HEPA Filters: High-Efficiency Particulate Air (HEPA) vacuums capture microscopic spores that may linger after cleaning surfaces.
- Air Scrubbing: Airborne spores are eliminated using advanced air scrubbers with HEPA filtration systems.
| Type of Surface | Cleaning Method | Disposal Required? |
| Nonporous (e.g., tile) | Antimicrobial cleaner | No |
| Porous (e.g., carpet) | Full material removal | Yes |
| Semi-porous (e.g., wood) | Sanding & sealing | Sometimes |
Addressing Moisture Problems
Mold thrives in damp conditions; therefore, resolving moisture issues is crucial for long-term prevention. Professionals may recommend actions such as: – Repairing leaks in roofs, walls, or plumbing systems. – Improving ventilation in areas like bathrooms and kitchens. – Installing dehumidifiers in particularly humid spaces.
Post-Cleanup Verification
After removal efforts are completed successfully: 1. Professionals conduct follow-up testing or visual inspections to confirm no remaining signs of active mold. 2. Homeowners receive advice on monitoring humidity levels and maintaining proper airflow throughout their property.
By following these carefully designed steps, professional remediation services provide not only effective solutions but also peace of mind that your space is safe from future infestations.
Effective Solutions from a Mold Removal Company Florida Residents Trust
Mold growth is a common issue in homes and commercial spaces, often leading to health and structural problems if left unaddressed. To tackle mold effectively, it is essential to understand what causes it and identify strategies to prevent its spread.
Common Causes of Mold Growth
Mold thrives in specific environments that provide the right conditions for its spores to grow.
- Leaking pipes or roofs
- High humidity levels (above 60%)
- Poor ventilation in bathrooms, kitchens, or basements
- Most molds grow well in temperatures between 60°F and 80°F (16°C–27°C).
- Mold feeds on organic matter like wood, drywall, fabric, and even dust particles.
- Areas with persistent water leaks or flooding are breeding grounds for mold.
Steps to Address Mold Effectively
Once mold growth is detected, addressing it promptly can prevent further damage.
- Identify the Source of Moisture:
Without resolving the moisture issue, mold will continue to reappear. Inspect common problem areas such as plumbing fixtures, HVAC systems, windowsills, and poorly ventilated spaces. - Improve Ventilation:
Use exhaust fans in high-moisture areas such as kitchens and bathrooms to reduce humidity levels. - Control Indoor Humidity Levels:
Invest in a dehumidifier if your area has naturally high humidity or if your home collects excessive moisture during certain seasons. Aim for an indoor humidity level of 30%-50%. - Fix Leaks Immediately:
Repair leaking pipes, faulty gutters, or damaged roofs as soon as possible.
Preventative Maintenance Tips
| Routine Maintenance Tasks | Frequency |
| Inspect plumbing for leaks | Monthly |
| Clean gutters | Biannually |
| Check HVAC systems | Annually |
| Seal windows/doors properly | Annually |
| Use exhaust fans when showering/cooking | Daily |
Natural Methods for Prevention
- Use vinegar solutionsperiodically on surfaces prone to dampness.
- Add baking sodainto carpets before vacuuming—it absorbs excess moisture.
- Place charcoal deodorizersor silica gel packets around humid areas like closets or basements.
Understanding these fundamentals helps create an environment where mold struggles to thrive while keeping your home healthier long-term.
Effective Steps for Water Damage Restoration Florida and Contaminated Area Isolation During Mold Removal
Proper isolation of the contaminated area is one of the most critical steps during mold removal. This process prevents the spread of mold spores to unaffected areas of a home or building. Professionals carefully follow specific procedures and utilize specialized tools to ensure successful containment. Below, we break down how this process works and why it’s essential.
Why Isolation Matters
Mold spores are microscopic and easily become airborne during cleaning or removal. Without proper containment, these spores can settle in other parts of the property, potentially leading to further contamination.
– Protect occupants from exposure to mold spores.
– Prevent cross-contamination in unaffected areas.
– Ensure that remediation efforts are efficient and thorough.
Tools and Materials Used for Containment
Professionals rely on certain tools and materials to create barriers between the contaminated area and the rest of the property:
– Plastic Sheeting (6-mil or thicker):Used to seal off doors, windows, vents, and HVAC openings.Negative Air Machines:These machines create negative pressure within the contaminated zone to prevent airborne particles from escaping.Zippered Containment Doors:Allow controlled access in and out of enclosed spaces.HEPA Filters:Capture tiny mold particles that may escape into surrounding air.
Each tool plays a specific role in minimizing contamination risks during remediation efforts.
Key Steps in Isolating a Mold-Contaminated Area
- Assessing the Scope of Damage
Before isolation begins, professionals evaluate how widespread the contamination is. They identify all affected surfaces and determine if hidden mold exists behind walls or under flooring. - Establishing Physical Barriers
The next step involves setting up plastic sheeting over doorways, windows, or vents leading out from the work zone. Taping down edges tightly ensures that no gaps remain through which mold spores could escape. - Installing Negative Air Pressure Systems
Once barriers are established, remediation teams use negative air machines connected to HEPA filters to reduce air pressure inside the work area relative to adjacent spaces. This setup draws any stray particles inward rather than allowing them outward diffusion. - Disabling HVAC Systems
To avoid spreading spores through a home’s ventilation system, professionals temporarily shut down heating or cooling systems within contaminated zones until remediation is complete. - Creating Controlled Entry Points
Zippered doors enable technicians to enter or exit safely without compromising containment integrity during equipment transport or material disposal activities.
Common Mistakes During Isolation
| Mistake | Consequence | Solution |
| Using thin plastic sheeting | Tears easily under tension; allows spore leakage | Use durable 6-mil+ polyethylene |
| Improper sealing | Gaps allow airflow movement outside isolated zones | Double-check all taped edges |
| Ignoring HVAC involvement | Spores circulate through ventilation systems | Temporarily turn off HVAC units |
Final Considerations on Mold Containment
Effective isolation not only safeguards health but also ensures that cleanup costs remain manageable by preventing additional contamination elsewhere in your home or workplace environment.
By implementing these measures methodically during remediation projects – whether small-scale DIY fixes involving minimal risk factors OR larger commercial-level jobs requiring licensed contractor expertise – homeowners achieve peace-of-mind knowing potential hazards addressed head-on effectively
Expert Tips for Mold Inspection Florida: How to Detect and Treat Mold Under the Carpet
Mold growth under carpets can be a persistent issue, especially in areas with high humidity or water damage. If left untreated, it can lead to unsightly stains, unpleasant odors, and even health concerns such as allergies and respiratory issues. Here’s how you can efficiently detect and treat mold lurking under your carpet.
Signs of Mold Growth Under Carpets
Mold growth beneath carpets can sometimes go unnoticed until it becomes severe.
- Musty Odors: A persistent musty or earthy smell is often one of the first signs of mold.
- Discoloration: Visible dark spots or stains on the surface of the carpet may signal underlying mold.
- Dampness: Wet or damp areas on carpets that remain even after drying can promote mold growth.
- Allergy Symptoms: Unexplained allergy symptoms like sneezing, coughing, or skin irritation may arise if mold is present.
- Lifting Edges: Mold growth under carpets might cause the edges to curl up due to excess moisture.
Steps for Detecting Mold Under Carpets
- Focus on areas prone to moisture exposure, such as near windows, sinks, basements, and underneath furniture.
- Use gloves and slowly lift the edge of the carpet to examine its underside and the flooring underneath.
- Check for black, greenish, or white patches that may indicate mold colonies.
- A flashlight helps in spotting discoloration in dimly lit areas.
- Sniff closely at suspected areas for concentrated musty odors.
- Use at-home mold detection kits or hire professionals if you need further confirmation.
Treating Mold Under Carpets
- Equip yourself with gloves, goggles, an N95 mask, and long-sleeved clothing to avoid exposure.
- Open windows or use fans for proper airflow during cleaning.
- For severe infestations where cleaning isn’t possible, cut out affected portions using a utility knife.
- Bag contaminated pieces securely before disposal.
- Use a mixture of water and detergent (or vinegar) to scrub subfloor surfaces.
- Apply commercial anti-mold solutions for added protection against future regrowth.
- Ensure all surfaces are completely dry before laying down new carpeting or padding.
- Steam-clean carpets using high-temperature water to kill any remaining spores.
Preventing Future Mold Growth Under Carpets
| Prevention Method | Description |
| Control Humidity | Use dehumidifiers in damp rooms; maintain indoor humidity below 50%. |
| Fix Leaks Promptly | Install waterproof barriers near plumbing fixtures; repair leaks quickly. |
| Proper Ventilation | Ensure good airflow by opening windows regularly or using exhaust fans. |
| Waterproof Padding | Opt for carpet padding that resists moisture when installing new carpets. |
| Regular Cleaning | Vacuum regularly and deep-clean carpets periodically to remove dirt buildup. |
Detecting and addressing mold early not only improves indoor air quality but also extends your carpet’s lifespan while maintaining a healthier living space.
Removing Damaged Materials Safely During Mold Remediation
Mold remediation is a critical process aimed at restoring safety and health to your living or working environment. An essential part of this process involves the safe removal of materials that have been contaminated or irreparably damaged by mold growth. Professional handling during this stage is vital to prevent further contamination, ensure safety, and prepare the space for restoration.
Why Proper Removal of Damaged Materials is Crucial
When mold infiltrates porous materials like drywall, wood, carpets, or insulation, it can spread rapidly and compromise the structural integrity of these items. Simply cleaning these materials might not be enough since mold spores can embed deeply within them.
- The risk of continued mold growth.
- The spread of mold spores to unaffected areas.
- Health risks associated with exposure to airborne mold particles.
Improper handling at this stage may aggravate the problem by releasing spores into the air, creating new contamination zones.
Steps for Safe Removal of Mold-Damaged Materials
- Inspect all affected areas thoroughly to determine which materials are salvageable and which need removal.
- Identify porous materials like drywall, carpets, insulation, or ceiling tiles that cannot be effectively cleaned.
- Seal off contaminated zones using plastic sheeting and negative air pressure systems to prevent spores from spreading during removal.
- Wear appropriate PPE such as gloves, goggles, masks (e. g.
- Cut away small sections of drywall rather than breaking large panels to minimize dust and spore release.
- Roll up carpets carefully and bag them in heavy-duty plastic before transporting them out.
- Place contaminated items in sealed bags labeled as hazardous waste before disposal in accordance with local regulations.
- Ensure that debris does not linger in open spaces where it could reintroduce spores into the environment.
- Vacuum surrounding surfaces with HEPA-filtered vacuums post-removal.
- Use antimicrobial solutions on non-porous surfaces adjacent to the removed material’s location for additional protection.
Commonly Removed Items During Mold Remediation
| Material | Reason for Removal | Alternative Action (if applicable) |
| Drywall | Porous surface allows deep mold growth | Replace with new drywall |
| Carpets | Mold embeds into fibers | Replace; consider hard flooring |
| Insulation | Absorbs moisture easily | Replace; use moisture-resistant types |
| Wood (Severe Damage) | Warping or deep cracks caused by moisture | Sand & treat mild cases; replace severe cases |
Tips for Homeowners During This Process
- Avoid entering work zones unless authorized by professionals.
- Confirm that all contractors dispose of contaminated waste properly per local guidelines.
- Monitor air quality improvements after material removal—persistent odors or symptoms may indicate incomplete remediation efforts.
By addressing damaged materials promptly and systematically during remediation efforts, you ensure a healthier living environment while preventing future complications related to lingering contamination risks.
Step-by-Step Guide to Mold Removal Florida Homeowners Can Trust
Mold remediation is a systematic process designed to remove mold infestations and prevent their return. Understanding the steps involved can provide homeowners with insight into what to expect and how professionals handle such situations.
– Determine the type of mold, if necessary, through lab testing.
Step 1 Containment of Affected Areas
– Installing negative air pressure machines equipped with HEPA filters.
These measures ensure that microscopic spores do not migrate during cleaning.
Step 2: Air Filtration
Air filtration plays a significant role in maintaining air quality during remediation. Professionals utilize advanced equipment, including: – HEPA air scrubbers that capture airborne mold spores. – High-powered vacuums fitted with HEPA filters for surface cleaning.
This step is crucial in reducing the risk of inhaling harmful particles during and after the removal process.
Step 3: Removal of Mold-Infested Materials
Mold often thrives on porous materials like drywall, carpeting, and insulation. Depending on the extent of contamination: – Irreparable materials are removed and disposed of safely following local regulations. – Nonporous surfaces like glass or metal are cleaned using antifungal solutions.
Professionals carefully discard all contaminated debris to prevent further exposure.
| Material | Action Taken |
| Drywall | Cut out damaged sections |
| Carpets | Removed if heavily infested |
| Wood (nonstructural) | Treated with antimicrobial agents |
| Upholstery | Cleaned or discarded as needed |
Step 4: Cleaning and Sanitization
After removing damaged items, all remaining surfaces are meticulously cleaned using specialized techniques: – Scrubbing with detergents or chemical cleaners tailored for mold elimination. – Applying antimicrobial sprays to inhibit future growth.
Furniture, personal belongings, and adjacent spaces may also be treated depending on their proximity to contamination zones.
Step 5: Addressing Moisture Problems
Since mold thrives in damp environments, addressing moisture sources is essential. Common fixes include: – Repairing leaks in plumbing or roofing systems. – Improving ventilation in high-humidity areas like bathrooms or basements.
Professionals may recommend installing dehumidifiers or making structural changes to resolve underlying issues permanently.
Step 6: Restoration and Prevention
Once all traces of mold are removed, damaged structures (e. g. , drywall) are repaired or replaced. Finally: – Preventative measures are suggested, such as regular HVAC maintenance or monitoring humidity levels indoors.
Many companies offer follow-up inspections to ensure long-term effectiveness.
By following these steps methodically, professional remediation teams can restore your property’s health while minimizing risks associated with improper handling.
Effective Mold Remediation Florida: 9 Common Types of Mold and How to Remove Them
Mold is a common household issue that can have serious implications for your health and the structural integrity of your home. Identifying the type of mold present is essential to choosing the appropriate removal method. Below are nine common types of mold that could be growing in your home, along with tips on how to effectively remove them.
- Appearance: Dark green or black, slimy texture
- Health Risks: Respiratory issues, fatigue, irritation of eyes and skin
- Wear protective equipment such as gloves, goggles, and an N95 mask.
- Use a mixture of one cup of bleach to one gallon of water for non-porous surfaces.
- Discard heavily infested porous materials like drywall or carpet.
- Appearance: Often powdery, colors range from white to yellow or green
- Health Risks: Allergic reactions, respiratory problems
- HEPA vacuum the affected area first to prevent spores from spreading.
- Clean surfaces with a commercial mold remover or vinegar solution.
- Appearance: Ranges from olive green to black; grows on both wood and fabrics
- Health Risks: Triggers asthma symptoms and skin irritation
- Wash hard surfaces with soap and water followed by a disinfectant spray.
- Launder contaminated fabrics at high temperatures or consider discarding them if growth is extensive.
- Appearance: Blue-green or white; often found on damp walls, food, or insulation materials
- Health Risks: Can cause sinus infections and lung inflammation
- Dry out the area using dehumidifiers since penicillium thrives in moist conditions.
- Scrub affected areas with soapy water before applying antimicrobial spray.
- Appearance: Dark brown patches often found near windows and sinks where humidity levels are high
- Health Risks: Common allergen linked to respiratory issues such as hay fever
- Use hydrogen peroxide (3%) sprayed onto the affected surface.
- Allow it time to penetrate before scrubbing thoroughly.
- Appearance: Cotton-like texture; changes from white/gray to dark brown over time
- Health Risks: Triggers allergies; associated with water-damaged properties
- Removal Method:
| Step | Action | |——|——–| | Step 1 | Address leaks causing water damage immediately.
- Effective Mold Remediation Florida Tips to Prevent Mold Growth in Your Home
- Comprehensive Guide to Mold Remediation Florida: Identifying and Solving Indoor Moisture Problems
- Mold Remediation Florida: Comprehensive Services and Resources for Safe and Effective Mold Removal
- Effective Mold Removal Florida: A Step-by-Step Guide to Remediation
- Comprehensive Guide to Mold Remediation Florida Homes Need
- What to Expect from Mold Removal Services Florida and How Professionals Handle the Process
- 6 Steps to Comprehensive Mold Remediation in Florida
- Comprehensive Guide for Mold Removal Florida Residents Can Trust
- Effective Mold Removal Florida: Key Steps and Professional Techniques